SwiftUI之使用 Combine 和 ViewModel 构建一个注册页面
在 SwiftUI 中,Combine 是声明式UI的核心关键。接下来,我们将构建一个包含三个TextField的注册页面,以及实现常见表单验证来学习和掌握Combine的基础原理。
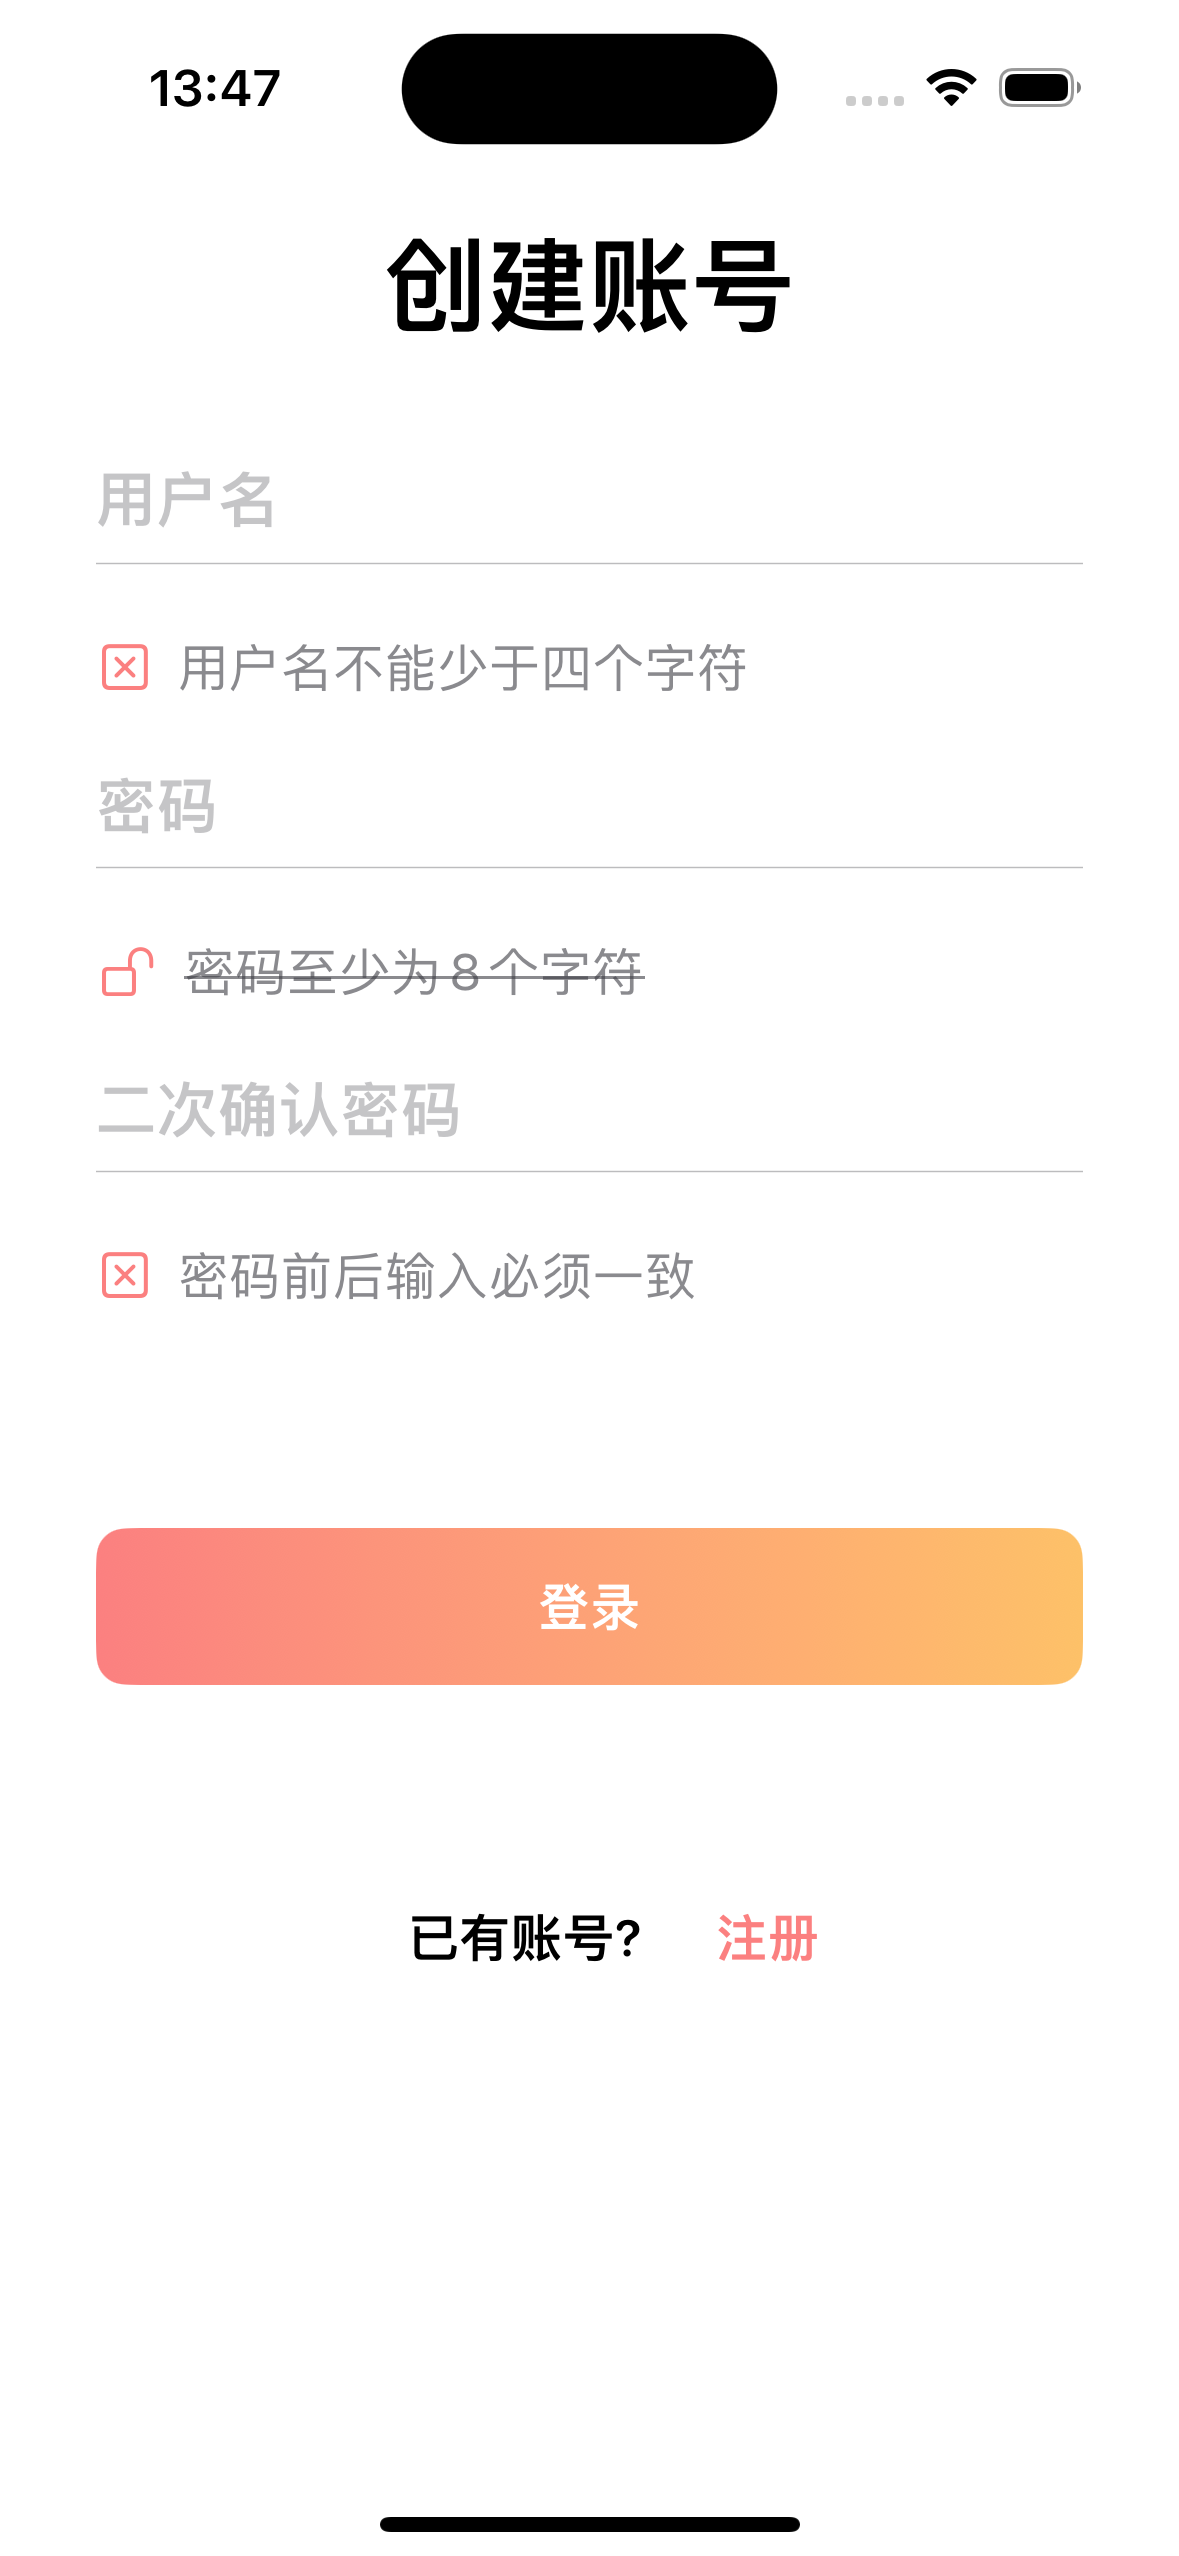
构建基础页面
首先,我们构建下面的一个基础界面:
ContentView.swift视图部分:1
2
3
4
5
6
7
8
9
10
11
12
13
14
15
16
17
18
19
20
21
22
23
24
25
26
27
28
29struct ContentView: View {
var userName: String = ""
var password: String = ""
var confirmationPassword: String = ""
var body: some View {
VStack {
Text("创建账号")
.font(.system(.largeTitle, design: .rounded))
.bold()
.padding(.bottom, 30)
FormTextField(fieldValue: $userName, fieldName: "用户名")
RequirementText(text: "用户名不能少于四个字符")
.padding()
FormTextField(isSecure: true,fieldValue: $password, fieldName: "密码")
RequirementText(iconName: "lock.open", text: "密码至少为8个字符",isStrikeThrough: true)
.padding()
FormTextField(isSecure: true, fieldValue: $confirmationPassword, fieldName: "二次确认密码")
RequirementText(text: "密码前后输入必须一致",isStrikeThrough: false)
.padding()
.padding(.bottom, 50)
SignInButton()
FooterView()
Spacer()
}
.padding()
}
}
FormTextField视图:1
2
3
4
5
6
7
8
9
10
11
12
13
14
15
16
17
18
19
20
21
22
23
24// 表单输入框
struct FormTextField: View {
var isSecure: Bool = false
var fieldValue: String
var fieldName: String = ""
var body: some View {
VStack {
if isSecure {
SecureField(fieldName, text: $fieldValue)
.font(.system(size: 20, weight: .semibold, design: .rounded))
.padding(.horizontal)
} else {
TextField(fieldName, text: $fieldValue)
.font(.system(size: 20, weight: .semibold, design: .rounded))
.padding(.horizontal)
}
Divider()
.frame(height: 1)
.background(Color(red: 240/255, green: 240/255, blue: 240/255))
.padding(.horizontal)
}
}
}
RequirementText视图:1
2
3
4
5
6
7
8
9
10
11
12
13
14
15
16
17
18struct RequirementText: View {
var iconName:String = "xmark.square"
var iconColor: Color = Color(red: 251/255, green: 128/255, blue: 128/255)
var text: String = ""
var isStrikeThrough: Bool = false //是否划线
var body: some View {
HStack {
Image(systemName: iconName)
.foregroundStyle(iconColor)
Text(text)
.font(.system(.body, design: .rounded))
.foregroundStyle(.secondary)
.strikethrough(isStrikeThrough)
Spacer()
}
}
}
SignInButton视图:1
2
3
4
5
6
7
8
9
10
11
12
13
14
15
16
17
18// 登录按钮
struct SignInButton: View {
var body: some View {
Button(action: {
}, label: {
Text("登录")
.font(.system(.body, design: .rounded))
.foregroundStyle(.white)
.bold()
.padding()
.frame(minWidth: 0, maxWidth: .infinity)
.background(LinearGradient(gradient: Gradient(colors: [Color(red: 251/255, green: 128/255, blue: 128/255), Color(red: 253/255, green: 193/255, blue: 104/255)]), startPoint: .leading, endPoint: .trailing))
.clipShape(RoundedRectangle(cornerRadius: 10))
.padding(.horizontal)
})
}
}
FooterView视图:1
2
3
4
5
6
7
8
9
10
11
12
13
14
15
16
17
18
19
20// 底部视图
struct FooterView: View {
var body: some View {
HStack {
Text("已有账号?")
.font(.system(.body, design: .rounded))
.bold()
.padding()
Button(action: {
}, label: {
Text("注册")
.font(.system(.body, design: .rounded))
.bold()
.foregroundStyle(Color(red: 251/255, green: 128/255, blue: 128/255))
})
}
.padding(.top, 50)
}
}
初识Combine
The Combine framework provides a declarative Swift API for processing values over time. These values can represent many kinds of asynchronous events. Combine declares publishers to expose values that can change over time, and subscribers to receive those values from the publishers.
- The
Publisherprotocol declares a type that can deliver a sequence of values over time. Publishers have operators to act on the values received from upstream publishers and republish them.- At the end of a chain of publishers, a
Subscriberacts on elements as it receives them. Publishers only emit values when explicitly requested to do so by subscribers. This puts your subscriber code in control of how fast it receives events from the publishers it’s connected to.Several Foundation types expose their functionality through publishers, including
Timer,NotificationCenter, andURLSession. Combine also provides a built-in publisher for any property that’s compliant with Key-Value Observing.You can combine the output of multiple publishers and coordinate their interaction. For example, you can subscribe to updates from a text field’s publisher, and use the text to perform URL requests. You can then use another publisher to process the responses and use them to update your app.
By adopting Combine, you’ll make your code easier to read and maintain, by centralizing your event-processing code and eliminating troublesome techniques like nested closures and convention-based callbacks.
以上是 Apple 关于Combine的介绍,根据这个介绍,我们可以知道Publisher 和Subscriber是Combine中两个重要的元素。
在Combine中,Publisher(发布者)发送事件,Subscriber(订阅者)订阅后接受来自Publisher的值。以TextField为例,当使用Combine时,每一次的键盘输入都会触发一个值变化的事件,然后Subscriber会去监听这些值的的变化,接收到这些值的变化后,就可以做进一步的操作,例如验证。
接着,我们来写一个验证器来对整个注册的表单进行验证。1
2
3class FormValidator: ObservableObject {
var isReadySubmit: Bool = false
}
Combine 和 MVVM
MVVM的全称是Model-View-ViewModel,它是一种开发中常用的设计模式。在实际的 app 开发中,随着项目的越来越复杂,我们不会推荐把所有的内容都放在一个单一的视图中。一般情况下,我们会将视图拆分为View和View Model两个部分。
- View主要负责界面的布局;
- View Model负责持有视图的状态和数据。
在我们即将实现的这个例子中,View Model持有的数据是:
- UserName
- Password
- Password confirm
以及一些状态:
- 用户名不能少于 4 个字符;
- 密码不能少于 8 个字符;
- 密码只能包含小写字母;
- 前后两次密码的输入必须一致
综上所述,这里的View Model将有 7 个属性,并且每一个属性发生变化是都会通知它的订阅者。1
2
3
4
5
6
7
8
9
10
11
12class FormValidator: ObservableObject {
// 输入
var username: String = ""
var password: String = ""
var passwordConfirm: String = ""
//输出
var isUsernameLengthValid: Bool = false
var isPasswordLengthValid: Bool = false
var isPasswordCapitalLetter: Bool = false
var isPasswordConfirmValid: Bool = false
}
表单验证
给FormValidator添加一个无参的初始化方法,在这个方法里面对各个属性进行验证和赋值。
username的验证:1
2
3
4
5
6$username
.receive(on: RunLoop.main)
.map { username in
return username.count >= 4
}
.assign(to: \.isUsernameLengthValid, on: self)
在上面的代码中, $username是我们想要监听的值,因为我们是正在订阅一个 UI 的变化,所以我们调用了receive(on:)方法来确保订阅者能接收到来自主线程的值,即RunLoop.main。
接着,我们使用map这个高阶函数来判断字符串的长度是否满足要求,如果满足则返回true,否则返回false。
最后就是使用Combine提供的内置订阅者assign将判断的结果转换给到我们的isUsernameLengthValid属性。
同理,针对password和passwordConfirm的验证如下:1
2
3
4
5
6
7
8
9
10
11
12
13
14
15
16
17
18
19
20// 验证长度是否满足
$password
.receive(on: RunLoop.main)
.map{ password in
return password.count >= 8
}
.assign(to: \.isPasswordLengthValid, on: self)
$password
.receive(on: RunLoop.main)
.map { password in
// 使用正则判断
let pattern = "[A-Z]"
if let _ = password.range(of: pattern, options: .regularExpression) {
return true
} else {
return false
}
}
.assign(to: \.isPasswordCapitalLetter, on: self)
针对密码的二次验证,使用下面的方式:1
2
3
4
5
6Publishers.CombineLatest($password, $passwordConfirm)
.receive(on: RunLoop.main)
.map{ (password, passwordConfirm) in
return !passwordConfirm.isEmpty && (passwordConfirm == password)
}
.assign(to: \.isPasswordConfirmValid, on: self)
另外,对于assign方法,它返回的是一个cancellable的实例对象,我们能够使用这个对象在合适的时候需要这个订阅。这里,我们还需要将返回的每一个实例对象进行存储,即调用store方法。1
private var cancellableSet: Set<AnyCancellable> = []
将每一个实例对象存储到这个集合中:1
.store(in: &cancellableSet)
应用定义好的 ViewModel 管理状态
回到我们的视图部分,将之前使用@State定义的状态值替换为使用ViewModel来管理。
修改ContentView.swift中的代码:1
2
3
4
5
6
7
8
9
10
11
12
13
14
15
16
17
18
19
20
21
22
23
24
25
26
27
28
29struct ContentView: View {
private var formValidator: FormValidator = FormValidator()
var body: some View {
VStack {
Text("创建账号")
.font(.system(.largeTitle, design: .rounded))
.bold()
.padding(.bottom, 30)
FormTextField(fieldValue: $formValidator.username, fieldName: "用户名")
RequirementText(iconColor:formValidator.isUsernameLengthValid ? Color.secondary : Color(red: 251/255, green: 128/255, blue: 128/255) , text: "用户名不能少于四个字符", isStrikeThrough: formValidator.isUsernameLengthValid)
.padding()
FormTextField( isSecure: true,fieldValue: $formValidator.password, fieldName: "密码")
VStack {
RequirementText(iconName: "lock.open", iconColor: formValidator.isPasswordLengthValid ? Color.secondary : Color(red: 251/255, green: 128/255, blue: 128/255), text: "密码至少为8个字符",isStrikeThrough: formValidator.isPasswordLengthValid)
RequirementText(iconName: "lock.open", iconColor: formValidator.isPasswordLengthValid ? Color.secondary : Color(red: 251/255, green: 128/255, blue: 128/255), text: "密码至少包含一个大写字母",isStrikeThrough: formValidator.isPasswordCapitalLetter)
}
.padding()
FormTextField(isSecure: true, fieldValue: $formValidator.passwordConfirm, fieldName: "二次确认密码")
RequirementText( iconColor: formValidator.isPasswordConfirmValid ? Color.secondary : Color(red: 251/255, green: 128/255, blue: 128/255) ,text: "密码前后输入必须一致",isStrikeThrough: formValidator.isPasswordConfirmValid)
.padding()
.padding(.bottom, 50)
SignInButton()
FooterView()
Spacer()
}
.padding()
}
}
此时,效果如下: